


 Description
 Work context
- First steps
- Tool management
- Tool handling
Work context
Firms usually have several departments in charge to elaborate different sections from the same software. For it they use installed identical development environments in each of department machines. This similarity in the development environments as opposed to the problem of having to depend on each one of the maquinas of the department makes think about a distribution and development under independent common environments for all and independent of developers machines.
WebDevStudio is able to create a development environment from a networking (local or remote) only having installed in developers machines a Web navigator. As it is showed in the next image, a server machine will act like pounding power station in the development of software, providing to the developers a sufficiently powerful environment so as to be able to carry out any computer science project.
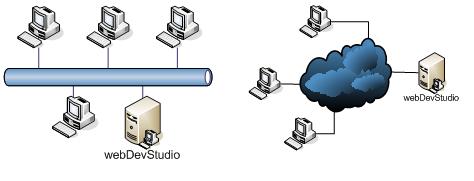
This server will be in charge to satisfy all the requests that the users solicit to him from a request to create a new user to the compilation of a file in a project. The set of operations that will be able to be made will be explained with detail in later sections.

First steps
User will be due to connect to the server machine executing a Web navigator from one of the client machines who have access to the server machine. Next it should be set the corresponding direction to the server machine with the purpose of obtaining the tool home page. Make sure that in the server machine is installed the tool correctly.

Once loaded the page correctly the beginning screen will display or what we will call HOME of the tool. From here you can see a small description of WebDevStudio as well as a news server that would be in charge to inform to the users on different matters.
The next thing that you should do is register in the system. So as to accomplish it, you must give a fex information which would identify you in the whole system. When you hace created a new account, you can start to use the tool with all freedom. You can enter project area so as to create, edit or delete them, see all the backup copies which you have created, etc.

Tool management
User management
A user is identified itself in the system by means of a unique name that we will call user. In order to guarantee that this user is really who claims to be, he will have to provide a private string that we will call password. As much user as password are associated to a user account and this one to a user as well. With the purpose of being able to enter to the system, the user will have to as much insert his user as his password in the areas where he requires to. The tool would verify in its data base that is correct the provided data and will allow the user to enter to its projects.
If a user enters for the first time to the system, he will have the possibility of obtaining a new account with which to work. This process will require the insertion of certain personal data as well as data necessary to identify to him in the system.
The tool has two general types of users according to the permissions which they have: the administrators with total permissions and the users themselves with castrated permissions.
Administrators will be those users who will be able to manage the accounts of users created in a while dice. These accounts are stored in a data base MySQL in the server machine so that they will have to be connected to be able to have access to it. They will be allowed them to perform four basic operations: creation, delete, edition and users display.
On the other hand, users themselves will not have sufficient permissions for managing the users in the system. Simply they will be allowed to handle their account data, being able to delete or modify.
Projects management
Once it has been established the connection with server machine, users will be able to completely manage the most important aspect of the tool: the projects. A project is defined by a series of parameters that will allow the user to develop it suitably.
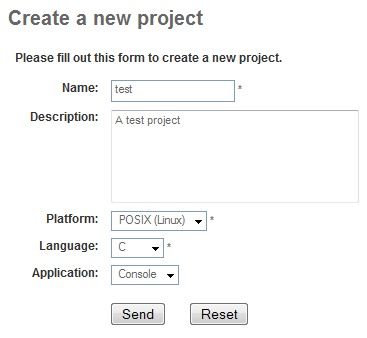
The tool will be in charge to store in its data base all the projects created until the moment so that the users can connect themselves and manipulate them. This manipulation will consist of four operations: visualize or publish the information of the project and delete or work on that project. The users will only be able to have access to the projects through the tool. A project in a while will be given made up of the following components:
- Code Files: the code files are the most important part of the project and on which the users worked more. This way, it will be allowed to have an absolute control of such that is explained more in detail in the following section.
- Backup copies: each project will maintain several backups with the purpose of preventing futures risks. This aspect also side but thoroughly in next sections.
File management
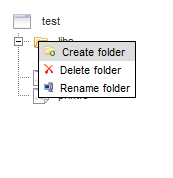
Arrived at this point, the users will have a project on which they will be able to work. The management of files is made on the work environment of the project which will show the files to us that this project arranges. On each one of them we will be able to make a series of operations to fit them to our interests.
Initially, the user will have to create a new file that will be created in the folder of the user with the assigned name. Next, the file will be available to be opened in the code editor for its modification. Each one of the files that have been created in the project will be able to visualize thanks to a navigator of files who will at any moment show the files that belong to the project opened at this moment.
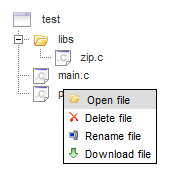
In order to change any of the files one will be due to press directly on the file and next it will be opened in the code editor. The most used operations can be made on each files, appears on emergent menu with right clic over the file.
Additionally, when a file opened in the code editor it allows to make on this concrete file in a much but high range of operations. To it the tool has a toolbar of operations that will be visible to the user at any moment.
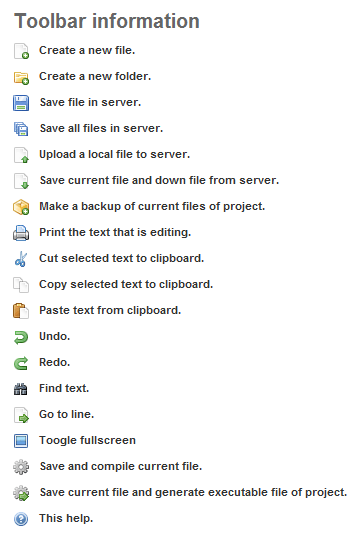
Like any code editor, also is the possibility of executing basic operations related to the code text: to cut or copy the text that is selected, to paste it where it is desired, to undo an operation and to redo an operation. Additionally it will be allowed to print the file that is open; this impression will be made of local way the user, that is to say, a dialogue window will be opened where will be the printers that the user arranges.
Tool handling
Code editor
The tool incorporates a code editor that will allow the users to publish the code files which they compose the computer science project. Each one of the code files is basically a text file oriented to a programming language with which the only thing that is is the text associated to the file.
The code editor is basically a text area embedded in the work environment where will be the active code file at every moment. Simultaneously it can only be an active file, that is to say, the single editor allows to have open a code file. The name of the loaded file will be in the tab and in the zone of text the associated code to the file. The following figure shows the text editor:
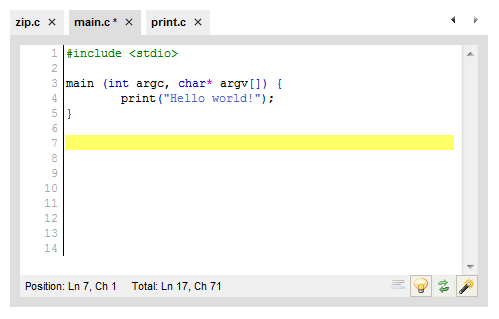
The code editor takes to associate a series of components:
- Toolbar: They are the operations that the tool allows on the files of the project.
- File navigator: It shows the filetree of the project.
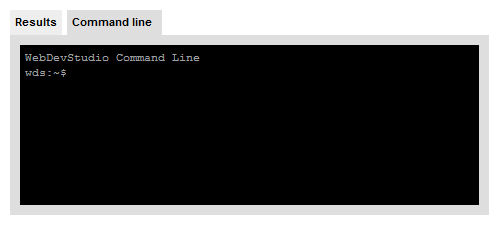
- Results: This zone of text will show the results to you of the operations that you are executing from the compilation to the backup creation.
- Console: In this other zone the user will be able to execute commands, like a UNIX terminal.
Backup copies
Any tool oriented to the development of software must incorporate a mechanism to allow to guarantee a security in the code that is being developed. With this reason, WebDevStudio incorporates the possibility of making backups of the files that belong to the project. This backup consists of storing an exact image of the state of the project at the same moment in which the copy is made.
The user will be the one in charge to make these backups by means of the toolbar. Selecting the suitable operation, the name of the backup will be asked for to you and a later confirmation. It is recommended that the name that occurs to the backup is representative. This way, the tool will copy all the code files of the project and it will store them internally.
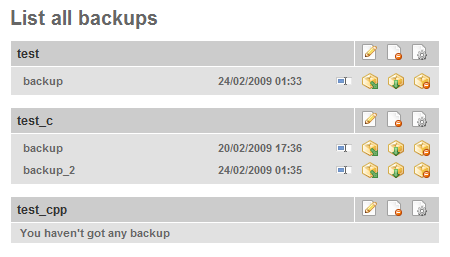
The tool allows to visualize all backups that the user has created of his respective projects with the purpose of administering them as he is desired. The administration process will consist of three basic operations:
- Rename a backup: It will allow to change the name of the file by another one more representative.
- To recover the backup: The recover process consists of leaving the project in the same state that when the backup was made, that is to say, to obtain the code files at that concrete moment.
- Download a backup: Obtain the backup in your computer.
- Delete a backup: Delete from server the backup.